Felted Mitered Square Potholder
Or "How I Spent My Thanksgiving Weekend"
I had a blast - taught my sister-in-law how to knit & happily spent most of Friday & all day Saturday knitting.
It took a few tries to get the proportions right, but I finally hit on a nice little recipe for a felted mitered square potholder.
Yarn: Any feltable worsted weight yarn. We used Cascade 220 in several colors
Needles: US 10.5/6.5 mm
Gauge: Not all that important, but we got something close to 8 sts/inch
Other stuff: Stitch Marker, Darning Needle
Cast on 32, place marker, cast on 32 more - 64 sts total.
Row 1: Knit to 2 sts before marker, SSK, slip marker, K2TOG, Knit to end
Row 2: Knit all sts
Reapeat rows 1 & 2 until you have 4 sts left on needle, then:
SSK, remove marker, K2TOG (you should have 2 sts remaining now), turn
K2TOG
Remove needle, pull yarn thru remaining stitch & you're done! Well, except for the weaving in of ends & the felting....
Here are some of the stripe patterns I used:
pattern 1:
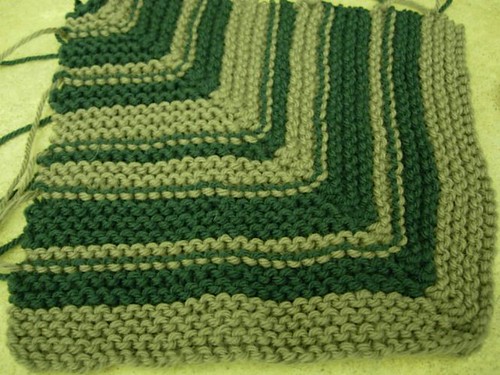
Keep in mind that when you are making stripes, if you only change color on RS (or WS) rows, you will have all your ends to weave in on one side. Which will make your fabric just a titch thicker on that side. Alternating the sides you change colors on will spread out ends on both sides, but you get the "color change stripe" as seen here:
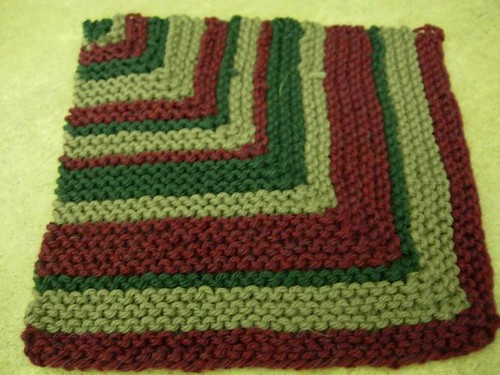
Here's a pre-felted potholder with all the color changes made on a RS row:
And, finally, here is a rather wobbly one (the first attempt, actually) where all the color changes were done on a RS row - this is a picture of it after felting and some rather pathetic attempts at "blocking". Which reminds me of another caveat: Try to make your stripes at least 4 rows wide. This one had alternating stripes of 4 rows and 2 rows. Those 2 row stripes are a bitch to weave in later. And there are a LOT of them....And I blame them for the wobbliness.
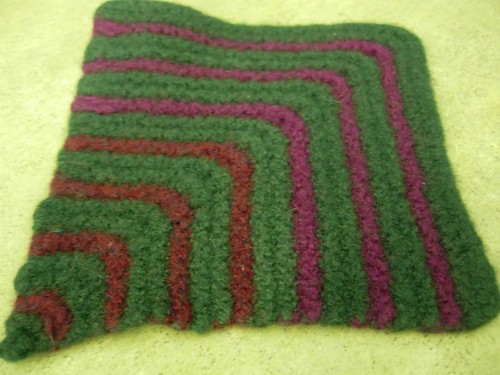
It kinda looks more like a Christmas tree in that picture, doesn't it... I wish I could get better pictures, but they are all at SIL's house.
except the one I had on my needles when I left that I will finish as soon as I finish all these damn Xmas gift clogs I am making...
I had a blast - taught my sister-in-law how to knit & happily spent most of Friday & all day Saturday knitting.
It took a few tries to get the proportions right, but I finally hit on a nice little recipe for a felted mitered square potholder.
Yarn: Any feltable worsted weight yarn. We used Cascade 220 in several colors
Needles: US 10.5/6.5 mm
Gauge: Not all that important, but we got something close to 8 sts/inch
Other stuff: Stitch Marker, Darning Needle
Cast on 32, place marker, cast on 32 more - 64 sts total.
Row 1: Knit to 2 sts before marker, SSK, slip marker, K2TOG, Knit to end
Row 2: Knit all sts
Reapeat rows 1 & 2 until you have 4 sts left on needle, then:
SSK, remove marker, K2TOG (you should have 2 sts remaining now), turn
K2TOG
Remove needle, pull yarn thru remaining stitch & you're done! Well, except for the weaving in of ends & the felting....
Here are some of the stripe patterns I used:
pattern 1:
- Color A - 6 rows
- Color B - 4 rows
- Color C - 2 rows
- repeat from aboce
- Color A - 7 rows
- Color B - 5 rows
- Color C - 3 rows
- Repeat from above (note: you are changing colors on odd-numbered rows & will get the color change line. Which is fine. I like it. Some don't. You *have* been warned, don't bitch at me, m'kay?)
- Color A: 8 rows
- Color B: 4 rows
- Color C: 6 rows
- Color A: 4 rows
- Color B: 6 rows
- Color C: 8 rows
- Repeat and/or vary how you will till you run out of rows (And no, I have no idea how many rows there are. I are layzee like that.)
- Color A - 4 rows
- Color B - 6 rows
- Color C - 2 rows
- Color A - 8 rows
- Color B - 4 rows
- Color C - 6 rows
- Color A - 2 rows
- Color B - 4 rows
- Color C - 2 rows
- Color A - 4 rows
- Color B - 6 Rows
- Color C - 4 rows
- Color A - 2 rows
- Color B - 2 rows
- Color C - 2 rows (? I am just guessing based on the pic. I didn't write this one down....)
Keep in mind that when you are making stripes, if you only change color on RS (or WS) rows, you will have all your ends to weave in on one side. Which will make your fabric just a titch thicker on that side. Alternating the sides you change colors on will spread out ends on both sides, but you get the "color change stripe" as seen here:
Here's a pre-felted potholder with all the color changes made on a RS row:
And, finally, here is a rather wobbly one (the first attempt, actually) where all the color changes were done on a RS row - this is a picture of it after felting and some rather pathetic attempts at "blocking". Which reminds me of another caveat: Try to make your stripes at least 4 rows wide. This one had alternating stripes of 4 rows and 2 rows. Those 2 row stripes are a bitch to weave in later. And there are a LOT of them....And I blame them for the wobbliness.
It kinda looks more like a Christmas tree in that picture, doesn't it... I wish I could get better pictures, but they are all at SIL's house.
except the one I had on my needles when I left that I will finish as soon as I finish all these damn Xmas gift clogs I am making...
posted by AMGblaghs at 4:56 PM
![]()
![]()

1 Comments:
Looks like we're unventing the same thing. It took me three tries playing with various decreases to get a mitered garter square that I liked for our afghan project, and now I see that I reinvented the wheel! All's fun in knitting, isn't it? My square is at http://pdxknitterati.wordpress.com
I linked here from your Ravelry page...
Post a Comment
<< Home